Protocols
- Culture Medium / Maintenance
- Rye A Agar ( For long-term maintenance) for 1 liter
- Rye B Agar (For sporulation) for 1 liter
- Rye A SLANTS
- Pea Broth (For mycelial growth and DNA extraction)
- 10% Unclarified V8 Agar
- 10% Clarified V8 Agar
- Culture Storage( 15% DMSO)
- Culture Storage (10% GLYCEROL)
- Culture Retrieval From –135 oC
- How To Make Stock Solutions For Clean-Up Media (Wear Gloves)
- Slants for Mineral Oil Storage
- Water Agar
- Sloppy Water Agar
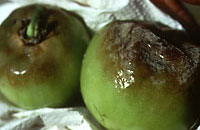
- Isolation from infected tissue
- RG 57 genomic DNA fingerprinting
- Late blight rating system (modified from James, C. 1971)